Windows Vista is packed with cool eye candy, handy new features, and improved security. But all this comes at a price -- and many new Vista users are paying that price in the form of decreased performance as compared to Windows XP. Performance issues are the most common complaint I hear from readers who've just installed Vista or bought a new Vista machine, and my own experience shows that the concerns are valid.
Turn off the bling
One obvious way to make Vista run more like XP is to, well, make Vista more like XP. Turning off the fancy Aero interface, turning off the sidebar, and otherwise disabling the features that make Vista look and feel unique will help speed up performance. But for most of us, that's not exactly the solution we were looking for.
dentify your bottlenecks
The first step in fixing a problem is to find out exactly what's broken. Vista includes a number of tools that help you pinpoint the cause of performance problems.
Performance Monitor
Vista, like its business-oriented predecessors (XP Professional, Windows 2000, and NT Workstation), includes a performance monitoring tool that allows you to do detailed monitoring of various counters relating to both software and hardware components.
You'll find the tool under a new name, Reliability And Performance Monitor, on the Administrative Tools menu in Control Panel. Figure A shows the Performance Monitor, monitoring % Processor Time and Memory Pages/Second.
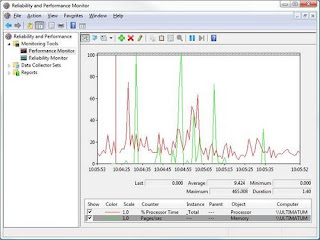
The Performance Monitor is a great tool for IT pros, but it may be a bit daunting for the average user. Luckily, Vista has a simpler way for you to know, at a glance, which of your hardware components may be bottlenecks when it comes to running Aero.
Performance Information And Tools
A new feature in Vista is the Performance Information And Tools control panel, which analyzes your computer's hardware components and assigns a rating known as the Windows Experience Index (WEI) score. Your processor, RAM, graphics capabilities (separately rated for Aero and for gaming/3D), and primary hard disk are each rated individually. The lowest score determines your overall WEI score.
Possible scores range from 1.0 to 5.9. Generally, a computer needs a base WEI of 3.0 or better to satisfactorily run Aero and other advanced features. To find out your WEI, click Start | Control Panel | Performance Information And Tools.
Running this tool showed me why using Vista on my laptop was such a different experience from using it on my desktop. As shown in Figure B and Figure C, the desktop machine's hardware rated a 5.1, whereas the laptop scored a measly 2.0.
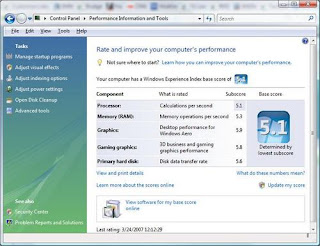
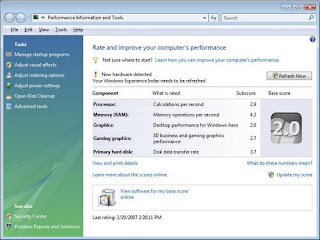
As you can see, the RAM scores fine now, with 1.5 GB of memory, and the hard disk isn't the problem, either. Even the processor is close to the 3.0 threshold. But the graphics adapter in the laptop is not up to the task of running Aero.
That leads me to this question: Why is Sony selling these systems with Vista Business installed if they won't run the interface properly? But that doesn't help with the immediate problem: How can I make this computer work acceptably and benefit from at least some of Vista's new features?
The Performance Information And Tools interface makes it easy for you to tweak several components that can affect Vista performance. These options are shown in the Tasks pane on the left side of the window, as you can see in Figure C. Some performance tweaks you can do from this interface include:
- Managing startup programs to help Vista load more quickly
- Adjusting visual effects to help Vista perform better if you have an inadequate video card
- Adjusting other advanced settings that affect performance, such as processor allocation and paging file location and size
- Adjusting indexing options to prevent indexing from using up too many resources and thus slowing other applications
- Adjusting power settings to balance performance needs with energy conservation needs
- Cleaning up the hard disk so Vista can access data stored there more quickly
- Using advanced tools, such as the disk defragmenter, task manager, system information tool, event logs, and Reliability And Performance Monitor to diagnose performance problems and fix them
Manage startup programs
The more programs you have loading when the computer boots up, the longer it will take for the operating system to be ready to use. You can cut down on startup time by eliminating from startup those programs you don't really need to run every time you start the computer.
Clicking the Manage Startup Programs selection in Performance Information And Tools will open the Windows Defender Software Explorer, as shown in Figure D.
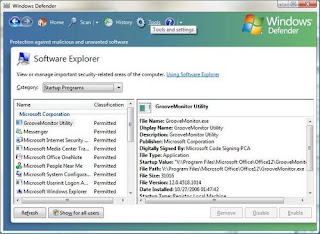
You can scroll through the list to see all the programs that run at startup. The right pane displays a great deal of information about the selected program, including its filename, display name, description, publisher, digital signature information, startup value, path, file size, version number, the date it was installed, startup type (where it is designated to start up on boot -- for example, in the Current User settings in the registry), location, and whether the program shipped with the operating system.
Some programs can be removed or disabled by selecting the program in the left pane and clicking the Remove or Disable button in the bottom-right area of the window. Others will have these buttons grayed out. If the Remove and Disable buttons are unavailable, you'll need to remove the program from startup manually. This may involve removing it from the Startup folder, which you'll find on the Start | All Programs menu, as shown in Figure E.
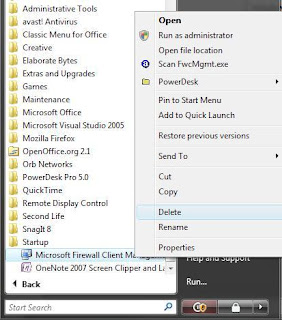
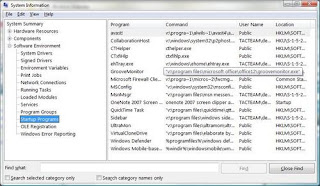
To access the System Information tool, type msinfo32 in the Start Menu's Search/Run box or on the All Programs | Accessories | System Tools menu. This tool is for viewing the information only; you can't make changes to the startup programs here.
In some cases, you may have to edit the registry to prevent a program from loading at startup. The System Information tool will show you the location in the registry that needs to be edited.
Adjust visual effects settings
You may be able to speed up performance by adjusting the settings of Vista's visual effects, thus sacrificing some of the bling for increased performance. When you click this option in the Performance Tools And Information interface, the User Account Control dialog box will display, requiring you to enter administrative credentials. If you're already logged on as an administrator, you'll be prompted to approve continuing. This opens the Performance Options dialog box, shown in Figure H.
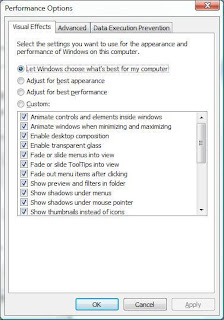
You can also access the Performance Options dialog box from the Control Panel | System | Advanced System Settings | Settings button in the Performance section.
Either way, on the Visual Effects tab, you have four choices:
- Let Windows choose the best settings for your computer
- Adjust for best appearance
- Adjust for best performance
- Create custom settings, choosing to turn on or off whichever visual effects you want
The more visual effects you have turned on, the more the hit on performance. If you choose the option to adjust for best performance, all of the visual effects will be disabled. You may want to turn off those effects that are purely aesthetic, such as transparent glass and fading or sliding menus, while leaving on those that are more functional, such as showing thumbnails instead of icons.
Adjusting other advanced settings
In the Performance Options dialog box, you can click the Advanced tab to adjust other settings that affect performance. In the top section, you can control processor scheduling, as shown in Figure I.
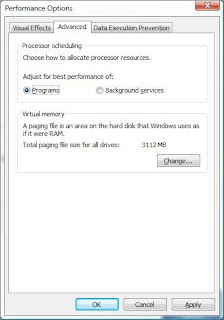
Here, you can adjust for best performance of applications or background services. For the most responsiveness, you'll want to adjust for best performance of applications.
In the second section, you can make changes to the paging file location and size that can improve performance. Click the Change button to display the Virtual Memory settings dialog box, shown in Figure J.
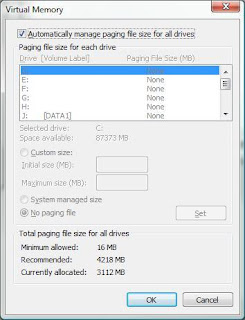
By default, Windows automatically manages the paging file. If you deselect this check box, you can change the location of the paging file, spreading it out among multiple physical disks if you have them. This can speed access to paged data.
You can also increase the size of the paging file and/or make it static, so that instead of using the resources to increase and decrease the size, it always stays the same size. This can also slightly increase overall performance but will tie up more of your disk space. To set a static paging file, click the Custom Size button and enter the same number (file size in MB) in the Initial Size and Maximum Size fields.
Adjust indexing options
You can control what locations should be indexed by Vista's search engine. Indexing can take a lot of resources and put a drag on other running applications if you have a low-powered computer.
In the Performance Information And Tools dialog box, select Indexing Options in the left pane. Then, click the Modify button in the Indexing Options dialog box and click the Show All Locations button at the bottom of the Indexed Locations dialog box. Now you can individually select and deselect the locations to be indexed, as shown in Figure K.

Adjust power settings
Generally, using more power results in better performance. You can select the balance you prefer between saving energy and getting the highest performance by adjusting power plan settings.
Vista has three preconfigured power plans you can choose from, as shown in Figure L:
- Balanced (gives equal weight to energy savings and performance)
- Power Saver (sacrifices performance to save energy)
- High Performance (sacrifices energy conservation for better performance)

You can also create a custom power plan, by selecting Create A Power Plan in the left pane. You start with one of the three plan templates, adjust individual components using a wizard, and then save the plan.
Disk cleanup and defragmentation
You can use Vista's disk cleanup and defragmentation tools to remove unwanted files and to rearrange data on the disk so that files are not fragmented. Both of these actions will help increase disk access performance.
You can open the Disk Cleanup tool from the Performance Information And Tools left tasks pane or from the All Programs | Accessories | System Tools menu.
The Disk Cleanup tool allows you to select whether to clean up files from your own user profile only or the files of all users. When you select a specific drive to clean up, the tool will calculate how much space you will be able to free by running the cleanup, as shown in Figure M.


You can access the Disk Defragmentation tool from the Advanced Tools option in the left pane of the System Information And Tools console or from the All Programs | Accessories | System Tools menu.
You can (and should) set the Disk Defragmenter to run on a regular basis, such as once per week. To avoid a performance hit, schedule the defragmenter to run at a time when you aren't normally using your computer. You can also do a manual defragmentation if you think it's necessary (for example, if you've spent the day uninstalling and installing programs, and the computer seems to be running slower). Just click the Defragment Now button, shown in Figure N.
More ways to gather performance information
The Advanced Tools section of the Performance Information And Tools utility gives you quick links to the following tools for gathering performance-related info:
- Event log
- Reliability And Performance Monitor
- Task Manager
- System Information
- Performance Options
- Disk Defragmenter
- System Health Report
Summary
Vista can be a performance hog, but there are many ways you can tweak the OS components to speed it up. Microsoft has made it easy by consolidating many of these actions in the Performance Information And Tools console.


