Showing posts with label multi boot. Show all posts

Thursday, July 3, 2008

Fixing an unbootable windowsXP installation in few simple steps!

Getting to the Windows Recovery Console

  1. Insert your Windows XP CD into your CD and assure that your CD-ROM drive is capable of booting the CD. Configuring your computer to boot from CD is outside of the scope of this document, but if you are having trouble,
  2. Once you have booted from CD, do not select the option that states: "Press F2 to initiate the Automated System Recovery (ASR) tool." You're going to proceed until you see the following screen, at which point you will press the "R" key to enter the recovery console:
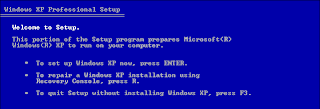
  • After you have selected the appropriate option from step two, you will be prompted to select a valid Windows installation (Typically number "1"). Select the installation number, (As mentioned, "1" in most cases), and hit enter. If there is an administrator password for the administrator account, enter it and hit enter. You will be greeted with this screen, which indicates a recovery console at the ready:

Proceeding With the Repair Functions

  • There are eight commands you must enter in sequence to repair any of the issues I noted in the opening of this guide. I will introduce them here, and then show the results graphically in the next six steps. These commands are as follows:
    • C:\windows> ATTRIB -H C:\boot.ini
    • C:\windows>ATTRIB -S C:\boot.ini
    • C:\windows>ATRIB -R C:\boot.ini
    • C:\windows> del boot.ini
    • C:\windows> BOOTCFG /Rebuild
    • C:\windows> CHKDSK /R /F
    • C:\windows> FIXBOOT

the BOOTCFG /REBUILD command which searches for pre-existing installations of Windows XP and rebuilds sundry essential components of the Windows operating system, recompiles the BOOT.INI file and corrects a litany of common Windows errors. It is very important that you do one or both of the following two things: First, every Windows XP owner must use /FASTDETECT as an OS Load Option when the rebuild process is finalizing. Secondly, if you are the owner of a CPU featuring Intel's XD or AMD's NX buffer overflow protection, you must also use /NOEXECUTE=OPTIN as an OS Load Option. I will demonstrate both commands for the purpose of this guide, but do not set NOEXECUTE as a load option if you do not own one of these CPUs. For the "Enter Load Identifier" portion of this command, you should enter the name of the operating system you have installed. If, for example, you are using Windows XP Home, you could type "Microsoft Windows XP Home Edition" for the identifier. This gives the process some authenticity, if you're keen on being a perfectionist.

the ckdsk command checks integrity of the hard drive containing the Windows XP installation. While this step is not an essential function in our process, it's still good to be sure that the drive is physically capable of running windows, in that it contains no bad sectors or other corruptions that might be the culprit. No screenshot necessary here! Just type CHKDSK /R /F at the C:> prompt. Let it proceed; it could take in excess of 30 minutes on slower computers..

FIXBOOT. This writes a new boot sector to the hard drive and cleans up all the loose ends we created by rebuilding the BOOT.INI file and the system files. When the Windows Recovery Console asks you if you are "Sure you want to write a new bootsector to the partition C: ?" just hit "Y," then enter to confirm your decision.

Results and Wrap-Up

It's time to reboot your PC by typing EXIT in the Windows Recovery Console and confirming the command with a stroke of the enter key. With any luck, your PC will boot successfully into Windows XP as if your various DLL, Hive, EXE and NTLDR errors never existed. You've just saved yourself from many hours of work, frustration, potential data loss and shelling out your hard earned money

Sunday, June 22, 2008

Making a Multi Boot CD with UBCD


well friends most of u must be familiar with the best boot troubleshooting tool u can have,that is the ultimate boot CD(UBCD)

it's a sys administrators dream CD considering the variety of offline tools it combines to rectify and recover ur unbootable computer and comes in just 115MB image file.
you can find BIOS flahing utility,BIOS password crackers,benchmarking tools,filesystem reading tools,hard disk wiping tools,anti virus tools,hard disk installatioin and error checking tools etc..
so i was just wondering wouldn't it be great to just combine the windowsXP installation and a few of the Linux live distros into the ubcd to have an even more useful disc at ur disposal and thus i hit upon this idea....here's the procedure:

Ading the windowsXP installation
1. Extract the ubcd files from the iso (using magicISO or ultraISO or ny such prog)
2. Copy all the files from the Xp installation CD into the root of the ubcd(ie /ubcd/) .there are a few hidden files as well so just make sure u copy them too!
3. Get windowsXP boot image frm here:

4. From wxp10.zip copy w2ksect.bin, win51 and win51ip(if not present) to the root of ubcd and of course from the correct version of windowsXP,pro or home
5.delete BOOTCAt.bin and BOOTIMG.bin
7. In UBCD/custom/custom.cfg add the entry for winxp installation

LABEL recovery
MENU LABEL XP Recovery Console
KERNEL /w2ksect.bin
APPEND


that's it!!u just added windowsXP to the UBCD list of user-defined tools

now just compile the ISO image with help of UBCD2ISO tool located in UBCD\tools from the DOS prompt


Adding linux live distros
linux live distros are pretty useful if u want to boot into ur unbootable computer for backing up data or if u need urgent accesss to some files so i have also considered adding them to the UBCD.i personally added SLAX and BACKTRACK3 To the UBCD.slax is a simple live linux distro and u'll easily get used to it's simple but powerful inteface.u can access all ur drives ur media fies,documents and even burn them as backup
bactrack3 is interesting live distro just for penetration testing(can b used for hacking wi-fi nets as well) was just new to it but thought i shud try it!
------------------------------------------------------------------------------------------------------------


1.First extract the content of both Slax and UBCD to your harddisk. I am assuming the content of slax is in c:\slax, while the content of UBCD is in c:\ubcd.
2.from the c:\slax\boot folder copy vmlinuz to c:\ubcd\boot\slax

then copy c:\slax\boot\initrd.gz to c:\ubcd\boot\slax.gz
3.copy the SLAX folder from the slax image to c:\ubcd
4..Edit "c:\ubcd\custom\custom.cfg" with a text editor:
LABEL Slax
MENU LABEL Slax
KERNEL /boot/slax
APPEND initrd=/boot/slax.gz ramdisk_size=6666 root=/dev/ram0 rw autoexec=xconf;telinit~4 changes=/slax/

if u want to run slax off the RAM


LABEL Slax2RAM
MENU LABEL Slax2RAM (loads slax to ram)
KERNEL /boot/slax
APPEND initrd=/boot/slax.gz ramdisk_size=6666 root=/dev/ram0 rw copy2ram autoexec=xconf;telinit~4


4.that's it.now just recompile the iso image using the inbuilt UBCD2ISO tool in UBCD\tools from dos prompt


u can combine the two as well
just do the steps i mentioned for wndowsXP installation and then the steps for slax except the editing of the ubcd\sustom\custom.cfg file. then finally just edit the custom.cfg file exactly like mine


MENU INCLUDE /menus/defaults.cfg
LABEL back MENU LABEL ..
KERNEL menu.c32

APPEND /menus/main.cfg


LABEL WindowsXP installation

MENU LABEL install WindowsXP by divyaprakash
KERNEL /w2ksect.bin
APPEND

LABEL Slax
MENU LABEL Slax

KERNEL /boot/slax
APPEND initrd=/boot/slax.gz ramdisk_size=6666 root=/dev/ram0 rw autoexec=xconf;telinit~4 changes=/slax/

LABEL Slax2RAM MENU
LABEL Slax2RAM loads slax to ram(min 512MB)

KERNEL /boot/slax APPEND initrd=/boot/slax.gz ramdisk_size=6666 root=/dev/ram0 rw copy2ram autoexec=xconf;telinit~4