Monday, July 28, 2008

Downgrading vista to windowsXP

Fed up of windows vista and wanna downgrade to xp but seemingly confused about it ?! Here's a working solution:

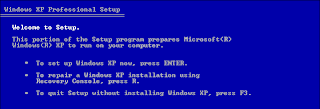
  1. in usr xp cd and run the recovery console br pressing R at the first screen
  2. you may be asked for the administrator password for the vista installation.in case u don't run the admin account and it is disabled,enable and change it's password from vista first by
typing lusrmgr.msc in run and navigate to c:\users folder and disable turn off the account for administrator
now change the password for this account and start over to the recovery console
3.now at recovery console tyep the following commands

fixboot
fixmbr
cd\
ren windows winvista

these commands effectively will deactivate the vista installation and replace the bootloader of vista with that of xp

4.now u can proceed with XP installation as normal and later on delete the inactive winvista folder
5. move ur user files just locate c:\users and restore ur files to new locations

Making vista bootable DVD from vista files

Here's an easy way to compile a bootable vista image from vista files copied into a folder
Just perform the following steps assuming you are in 0 level N' you will get success. Don't get modify any of the command below untill u r Sure what you are doing.
1. create a folder inside E:\ named vistaDVD
2. place all ur vista source inside the folder eg (E:\vistaDVD\*.*)
3. download oscdimg.exe
http://www.mediafire.com/?yn3nv3lxox2
4. copy oscdimg.exe to your c:\windows\system32 directory
5 open command prompt (Run--> cmd )
type this in ur command prompt

C:\Documents and Settings\admin>oscdimg -bE:\vistaDVD\boot\etfsboot.com -h -u2 -m -lVISTA_EN_DVD E:\vistaDVD\ E:\VistaDVD.iso

6. go to ur E:\ and locate a new file named vistaDVD.iso
7. burn that ISO with ur favourite burning software Eg: nero
8. Boot your system with the created DVD
9. must work if u go perfectly..


this is what it shud show up in the command prompt

Microsoft Windows XP [Version 5.1.2600]
© Copyright 1985-2001 Microsoft Corp.

C:\Documents and Settings\admin>oscdimg -bE:\vistaDVD\boot\etfsboot.com -h -u2 -
m -lVISTA_EN_DVD E:\vistaDVD\ E:\VistaDVD.iso

OSCDIMG 2.45 CD-ROM and DVD-ROM Premastering Utility
Copyright © Microsoft, 1993-2000. All rights reserved.
For Microsoft internal use only.


Scanning source tree complete (109 files in 22 directories)


Computing directory information complete

Image file is 2603384832 bytes

Writing 109 files in 22 directories to E:\VistaDVD.iso

0% complete

Monday, July 14, 2008

Installing Windows98 within windowsXP with MS virtual PC 2007

hi guys!i remember those happy times i began my computing with that pretty old,reliable,"not-so-pretty" but classic windows 98.So just to get that nostalgic feeling back i decided to try it once again but this time using microsoft virtual PC 2007 as a virtual OS within my current WindowsXP

here's a step by step guide
1.download microsoft virtual pc 2007 from here
2.download the windows 98 virtual pc configuration package i created from here
3.after downloading the two you need to have a bootable windows 98 CD or even a non-bootable cd would do as i have added the boot image to the package in step 2. it's important that if u have a bootable CD then u shud delete the file Win98EBD.vfd from the package.
4.make an ISO image of the windows 98 CD
5.install ms virtual pc and do the following
click on new
click next
in the next screen
select add existing virtual machine
click next
in the name and location screen just locate the files extracted frm my package in step 2 keeping in mind that u have deleted/unchanged the Win98EBD.vfd file depending on the type of 98 cd u have bootable/non bootable

click next
a settings screen appears where u can modify the settings.if u want u can increase the RAM as i have set it to 64 MB only
now u'll see the newly created package on main screen.in this screeenshot the second one u see is the one i'm using and the first one is the one i have created for this topic

now to start the installation processs(for bootable CD)
1.make an ISO image of windows 98 cd
2.select your virtual pc and click start
3.from CD menu of the ms virtual pc select captureISO image and locate the win 98 ISO image
4.run the 98 setup in the normal way by starting with cd-rom support and starting setup.exe from d:(cd rom drive letter)
5.be sure to select release iso image from cd menu wnvr cmputer requires a restart or else it will continue booting from the ISO image!

insatllation with non-bootable cd
1.for this process you must already have allowed the Win98EBD.vfd to remain.
2.just click start and in the cd menu select use physical drive to allow you to use the cd-rom drive
3.after the installation has started delete the file and continue using just the cd rom drive


njoy!

Saturday, July 12, 2008

A lowdown on Anti-Viruses

Virus scanners operate by searching your harddisk(s) for files which might be infected by a virus. This method is never 100% secure, since only known viruses (or known virus patterns) are detected. If an infection has been detected in a certain file, the virus scanner might be able to clean the file, but very often this is not the case. In that case, you can try another scanner to clean the file, you can try to replace the file or - as a last resort - delete it.
However, if many important operating system files are affected, it might be the best solution to reformat the harddisk and install the operating system from scratch.
There are even viruses can not be cleaned by mere hard-disk reformatting. E.g. so-called boot-viruses infect the boot-sector of disks, and will very often not be removed by simply reformatting the harddisk. In this case you will need to repair the boot-sector, a good utility for this can be found in Norton Utilities (not free).

AVG Free edition

AVG Antivirus has been an up and coming virus scanner for many years. Its free version is one of the most downloaded files on the Internet in the Computer Security sector. The new interface is clean and intuitive while still remaining useful.

AVG went through a rewrite of their virus scanning engine and included two of their stand alone products with AVG Antivirus as well. AVG Antispyware and AVG Antirootkit were both integrated with the virus scanner. Also revamped was the way AVG Antivirus uses the hardware within your computer. It was changed to make better use of the multiple cores which are common in todays computers. This should speed up scanning as well as reduce slowdowns.

Ease of Use:

Though AVG Antivirus is mostly a hands off program, there may be some instances when you may need to configure some advanced options. For 99% of the population though, the default options will be more than sufficient.

The menu's within AVG Antivirus are very simple and offer all the options and information needed to keep your system safe from Internet threats.

Effectiveness:

AVG Antivirus is one of the most complete programs i have found to date. It includes many new options to make it one of the most effective virus scanners on the market. It is still plagued by horrible slowdowns at times. Even things so simple as just typing an IM can be stopped for several seconds for some reason. If you can get past the occasional slowdowns of your computer, the scanning functionality of AVG Antivirus 8 is top of the line. With the rewrite of the scanning engine, AVG included multi processor support. That dual core processor you bought is actually going to start getting a workout now. AVG also included support for Windows Vista and the 64 bit versions of Windows XP and Vista.


Updates:

AVG Checks for updates every 4 hours by default. You can change this to any interval you wish. The updates section of AVG Antivirus also shows you which virus database version you have as well as when the last update was. It also tells you when the next update is scheduled. All of this information is also displayed on the main menu screen so that you always have the information at your fingertips.


Feature Set:

AVG Technologies, formerly Grisoft, has gone above and beyond with the new release of AVG Antivirus. Included with the virus scanner are a rootkit scanner, spyware scanner, an on-access scanner called Resident Shield, email scanner and a link scanning browser plugin. There is also a portion of AVG Antivirus called Web Shield. Web Shield is a chopped down firewall application that scans standard web ports for any threats encountered while browsing the web. It also includes protection for MSN Messenger and ICQ.


Ease of Installation:

Installing AVG Antivirus 8 was easy and only took about 10 minutes including downloading the additional updates required after installation finished. We had no issues or errors during the install.


Help/Support:

With the name change from Grisoft to AVG Technologies, the support site was updated and saw many improvements over the old design. Support offerings included with AVG Antivirus 8 are a FAQ, email support, phone based technical support as well as including a support section within the program itself.


Summary:

Version 8 of AVG Antivirus is a definite improvement over version 7.5. The scanning features have been sped up and the new interface is a clean and modern take on a time tested product.

Including a link scanner and integrating AVG Antispyware and AVG AntiRootkit provides an even more effective product. An unfortunate problem that has plagued AVG products for quite some time has not been eliminated even though AVG did a complete rewrite of the virus scanning engine. The on access scanner still tends to slow down computers to the point where they are not usable at times. This isn't a constant factor and has been improved significantly, but you will notice it when it happens. Beyond the slowdown issue, AVG Antivirus 8 is a complete product that will help keep your computer clean and safe.

Avast Anti-Virus

When you open AVAST 4 you'll find two different interfaces-one for the average user and one that is for the more advanced user. The simple interface has the look and feel similar to that of DVD player software. It is unfortunately difficult to use and navigate. The options are not labeled with the exception of a pop-up description when you hover over a button. The enhanced interface provides plenty of options to customize the program to fit your needs, however it also suffers from some simple tags for the buttons.

This software provides good protection with the on-demand scanner and the resident scanner though these slow down the system while performing file transfers or opening programs. The email protection is adequate for POP3, SMTP and IMAP accounts.

AVAST 4 didn't receive the West Coast Labs Checkmark level 1 or 2 or the VB100%. AVAST wasn't as effective as some of the other products reviewed. For better virus protection refer to some of our higher ranked products

The AVAST update feature checks for product and virus definition updates at either a user-defined interval or manually. When you do a manual check for updates, you decide which updates to install. When the software automatically checks for updates, it can update the files at that time or at a time previously specified during setup.

This product is very easy to install and i didn't encounter any problems.

The manufacturer offers online support with a knowledge base search and FAQs page. You can contact customer support through email-they responded to ours within 36 hours. The telephone support is only for commercial users.


BitDefender

The best line of defense against computer viruses, spyware and spam is BitDefender 2008, BitDefender 2008 is an outstanding product with a user–friendly interface that will scan all existing files on your computer, all incoming and outgoing emails, IM transfers and all other network traffic.

This latest version of BitDefender has a new Gamer Mode feature that minimizes impact on gaming performance by removing any popups or warnings during game play while still protecting your computer. The software still has all of the reliable features for which Bitdefender is known such as “Privacy Protection” for outgoing personal information, “Web Scanning” while you’re using the Internet and “Rootkit Detection and Removal,” which detects then removes hidden virus programs.

BitDefender has also improved their existing B–HAVE feature that runs pieces of software on a virtual computer to detect code that could be an unknown virus. In addition, a setup wizard makes it easy to customize security settings.

Ease of Use:

Softwin has covered all of the bases with BitDefender. This comprehensive product has an attractive, easy–to–use design that is consistent throughout the software and the manufacturer’s website. Because it is simple to use and updates itself automatically, you can install it on your system, then practically forget it’s there—an ideal solution for any user.

BitDefender has an option to display a small window called the “File Zone” on your desktop that indicates how many files the program has scanned in the past few minutes. You can also drag and drop files into the File Zone for an immediate scan. The program prepares a report of each completed scan so you know exactly what your files do or do not contain and you can instruct BitDefender to disinfect or remove any infected files or messages.

You can also customize BitDefender’s security settings for features such as AntiVirus, Antispam, Antispyware and Parental Control.


Effectiveness:

BitDefender’s customizable settings make the program effective for a variety of users. For example, if you receive legitimate commercial email, you can set BitDefender’s spam filters to allow specific or all emails.

Virus Bulletin rated BitDefender a VB100%, the highest honor for anti–virus software.

The VB 100% logo is awarded to anti–virus products that detect all current “in the wild” viruses during both on–demand and on–access scanning in Virus Bulletin’s comparative tests.

Additionally, BitDefender passed the ICSA 2007—a similar test that certifies the software can detect viruses, prevent virus replication, and doesn’t generate false positives.


Updates:

The live update feature checks for product and virus definition updates at either a user–defined interval, manually or default (every hour). When you do a manual check for updates, you can decide which updates to install. When the software automatically checks for updates, it can update the files immediately or at a specified time that you can determine during setup.


Feature Set:

BitDefender creates a summary log of events that shows the last definitions updates, details on any virus the software encounters, the last time you ran a scan, definitions number and more. And new in 2008, Bitdefender has added a Gamer Feature so it won't interrupt you during intense gaming.

BitDefender’s startup guard will tell you if a program is trying to load itself upon start up so you can choose to allow it or not. This software suite also comes with adware and spyware detectors. Though we recommend using an antispyware scanner, as they are designed specifically for this purpose, it is nice to have two programs working towards a common goal, to keep your computer clean.


Ease of Installation:

Installation of BitDefender is a snap. Uninstalling BitDefender was easy as well. We did find some leftover registry entries and directories after the uninstall completed though.


Help/Support:

When you purchase BitDefender you also receive one year of virus signature and scan engine updates. The manufacturer offers qualified technical support live via the Internet and telephone.

There is also an online database with answers to frequently asked questions (FAQs) and they have an email address–they answered our email within 6 hours. An online forum is also available on the BitDefender support site.

Download
http://rapidshare.com/files/128150607/BitAV_xtremew.org.rar
http://www.megaupload.com/?d=H5PILWA6

Kaspersky

Ease of Use:

In the past, Kaspersky had issues with their interface and the ease of use associated with it. They have listened to their customers over the years and changed the interface to rival others on the market. Now, simplicity is key within Kaspersky Antivirus. Kaspersky's main menu screen is split into different sections depending on what you would like to accomplish. Protection, Scan, Update, Reports and Data Files, and Support are listed on the left side of the screen with the options pertaining to each in a sub menu or on the right-hand side of the screen. There are also advanced options available through a settings option at the bottom of the screen.


Effectiveness:

Kaspersky Antivirus is one of the most advanced products on the market for virus scanning. Its on-access scanner is extremely fast and doesn't cause any noticeable slowdown of the computer while performing regular tasks such as browsing the web or writing documents or even higher end tasks such as transferring and moving files. The on-demand scanner within Kaspersky Antivirus is very fast as well. Another plus with Kaspersky is its light footprint on your system resources. Memory usage is minimal during the on access scanning times as well as on demand scanning. During a system scan, we noticed about 55MB of memory usage on average with up to 30% CPU usage.


Updates:

Kaspersky Antivirus checks for updates every hour by default. There are other programs out there that also do this but Kaspersky takes it to a new level because of the speed that they respond to outbreaks and release updates. If there is a major outbreak, Kaspersky Labs has an average update release time of less than 2 hours. This is the fastest of any antivirus company at this time.


Feature Set:

Features included with Kaspersky Antivirus are some of the most complete in the market. Beyond protecting your files and email from viruses, Kaspersky Labs took this a step further. They included a scanner that will check all the web pages you visit for viruses as well. This feature is especially useful for people that use Internet Explorer as their web browser due to the history of security holes related to viruses in the Internet cache your computer stores.

Kaspersky Antivirus also includes a registry protector called Registry Guard. This will prevent any unwanted changes to your computer registry.

We were especially impressed with the reporting features included with Kaspersky Antivirus. There are reports available for each scan that is done as well as "live" reports that are generated on the fly for several portions of the program that are scanning all the time.


Ease of Installation:

The installation of Kaspersky Antivirus is extremely simple and posed no problems for us. A single reboot was required to complete the installation.


Help/Support:

Kaspersky Labs offers several support options to help keep your system in top shape. Direct email support, support forums, phone support as well as an impressive FAQ are all available.


http://rapidshare.com/files/125864410/KasperskyIS_8.0.0.357_2009___BL_proof_Key_DD555.rar

Thursday, July 10, 2008

Follow these tips to boost Vista performance

Windows Vista is packed with cool eye candy, handy new features, and improved security. But all this comes at a price -- and many new Vista users are paying that price in the form of decreased performance as compared to Windows XP. Performance issues are the most common complaint I hear from readers who've just installed Vista or bought a new Vista machine, and my own experience shows that the concerns are valid.

Turn off the bling

One obvious way to make Vista run more like XP is to, well, make Vista more like XP. Turning off the fancy Aero interface, turning off the sidebar, and otherwise disabling the features that make Vista look and feel unique will help speed up performance. But for most of us, that's not exactly the solution we were looking for.

dentify your bottlenecks

The first step in fixing a problem is to find out exactly what's broken. Vista includes a number of tools that help you pinpoint the cause of performance problems.

Performance Monitor

Vista, like its business-oriented predecessors (XP Professional, Windows 2000, and NT Workstation), includes a performance monitoring tool that allows you to do detailed monitoring of various counters relating to both software and hardware components.

You'll find the tool under a new name, Reliability And Performance Monitor, on the Administrative Tools menu in Control Panel. Figure A shows the Performance Monitor, monitoring % Processor Time and Memory Pages/Second.
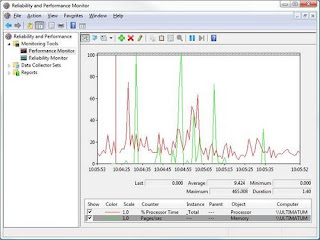
The Performance Monitor is a great tool for IT pros, but it may be a bit daunting for the average user. Luckily, Vista has a simpler way for you to know, at a glance, which of your hardware components may be bottlenecks when it comes to running Aero.

Performance Information And Tools

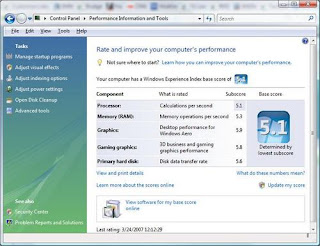
A new feature in Vista is the Performance Information And Tools control panel, which analyzes your computer's hardware components and assigns a rating known as the Windows Experience Index (WEI) score. Your processor, RAM, graphics capabilities (separately rated for Aero and for gaming/3D), and primary hard disk are each rated individually. The lowest score determines your overall WEI score.

Possible scores range from 1.0 to 5.9. Generally, a computer needs a base WEI of 3.0 or better to satisfactorily run Aero and other advanced features. To find out your WEI, click Start | Control Panel | Performance Information And Tools.

Running this tool showed me why using Vista on my laptop was such a different experience from using it on my desktop. As shown in Figure B and Figure C, the desktop machine's hardware rated a 5.1, whereas the laptop scored a measly 2.0.
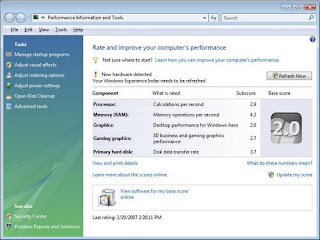

As you can see, the RAM scores fine now, with 1.5 GB of memory, and the hard disk isn't the problem, either. Even the processor is close to the 3.0 threshold. But the graphics adapter in the laptop is not up to the task of running Aero.

That leads me to this question: Why is Sony selling these systems with Vista Business installed if they won't run the interface properly? But that doesn't help with the immediate problem: How can I make this computer work acceptably and benefit from at least some of Vista's new features?

The Performance Information And Tools interface makes it easy for you to tweak several components that can affect Vista performance. These options are shown in the Tasks pane on the left side of the window, as you can see in Figure C. Some performance tweaks you can do from this interface include:

  • Managing startup programs to help Vista load more quickly
  • Adjusting visual effects to help Vista perform better if you have an inadequate video card
  • Adjusting other advanced settings that affect performance, such as processor allocation and paging file location and size
  • Adjusting indexing options to prevent indexing from using up too many resources and thus slowing other applications
  • Adjusting power settings to balance performance needs with energy conservation needs
  • Cleaning up the hard disk so Vista can access data stored there more quickly
  • Using advanced tools, such as the disk defragmenter, task manager, system information tool, event logs, and Reliability And Performance Monitor to diagnose performance problems and fix them

Manage startup programs

The more programs you have loading when the computer boots up, the longer it will take for the operating system to be ready to use. You can cut down on startup time by eliminating from startup those programs you don't really need to run every time you start the computer.

Clicking the Manage Startup Programs selection in Performance Information And Tools will open the Windows Defender Software Explorer, as shown in Figure D.
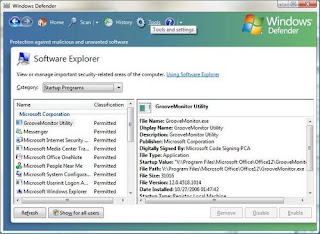

You can scroll through the list to see all the programs that run at startup. The right pane displays a great deal of information about the selected program, including its filename, display name, description, publisher, digital signature information, startup value, path, file size, version number, the date it was installed, startup type (where it is designated to start up on boot -- for example, in the Current User settings in the registry), location, and whether the program shipped with the operating system.

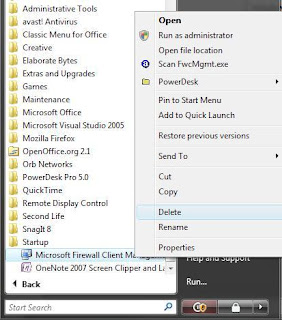
Some programs can be removed or disabled by selecting the program in the left pane and clicking the Remove or Disable button in the bottom-right area of the window. Others will have these buttons grayed out. If the Remove and Disable buttons are unavailable, you'll need to remove the program from startup manually. This may involve removing it from the Startup folder, which you'll find on the Start | All Programs menu, as shown in Figure E.
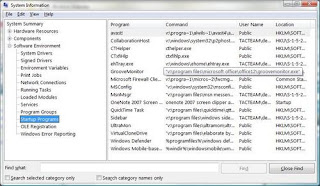
To access the System Information tool, type msinfo32 in the Start Menu's Search/Run box or on the All Programs | Accessories | System Tools menu. This tool is for viewing the information only; you can't make changes to the startup programs here.

In some cases, you may have to edit the registry to prevent a program from loading at startup. The System Information tool will show you the location in the registry that needs to be edited.

Adjust visual effects settings

You may be able to speed up performance by adjusting the settings of Vista's visual effects, thus sacrificing some of the bling for increased performance. When you click this option in the Performance Tools And Information interface, the User Account Control dialog box will display, requiring you to enter administrative credentials. If you're already logged on as an administrator, you'll be prompted to approve continuing. This opens the Performance Options dialog box, shown in Figure H.
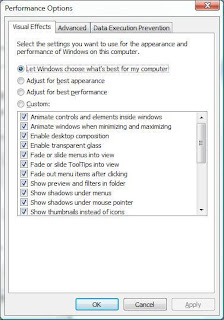

You can also access the Performance Options dialog box from the Control Panel | System | Advanced System Settings | Settings button in the Performance section.

Either way, on the Visual Effects tab, you have four choices:

  • Let Windows choose the best settings for your computer
  • Adjust for best appearance
  • Adjust for best performance
  • Create custom settings, choosing to turn on or off whichever visual effects you want

The more visual effects you have turned on, the more the hit on performance. If you choose the option to adjust for best performance, all of the visual effects will be disabled. You may want to turn off those effects that are purely aesthetic, such as transparent glass and fading or sliding menus, while leaving on those that are more functional, such as showing thumbnails instead of icons.

Adjusting other advanced settings

In the Performance Options dialog box, you can click the Advanced tab to adjust other settings that affect performance. In the top section, you can control processor scheduling, as shown in Figure I.
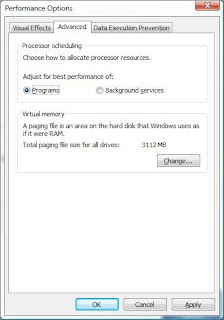

Here, you can adjust for best performance of applications or background services. For the most responsiveness, you'll want to adjust for best performance of applications.

In the second section, you can make changes to the paging file location and size that can improve performance. Click the Change button to display the Virtual Memory settings dialog box, shown in Figure J.
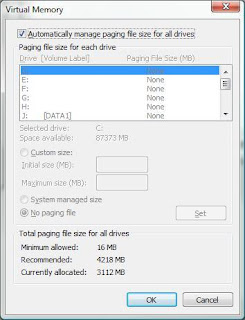
By default, Windows automatically manages the paging file. If you deselect this check box, you can change the location of the paging file, spreading it out among multiple physical disks if you have them. This can speed access to paged data.

You can also increase the size of the paging file and/or make it static, so that instead of using the resources to increase and decrease the size, it always stays the same size. This can also slightly increase overall performance but will tie up more of your disk space. To set a static paging file, click the Custom Size button and enter the same number (file size in MB) in the Initial Size and Maximum Size fields.

Adjust indexing options

You can control what locations should be indexed by Vista's search engine. Indexing can take a lot of resources and put a drag on other running applications if you have a low-powered computer.

In the Performance Information And Tools dialog box, select Indexing Options in the left pane. Then, click the Modify button in the Indexing Options dialog box and click the Show All Locations button at the bottom of the Indexed Locations dialog box. Now you can individually select and deselect the locations to be indexed, as shown in Figure K.


Adjust power settings

Generally, using more power results in better performance. You can select the balance you prefer between saving energy and getting the highest performance by adjusting power plan settings.

Vista has three preconfigured power plans you can choose from, as shown in Figure L:

  • Balanced (gives equal weight to energy savings and performance)
  • Power Saver (sacrifices performance to save energy)
  • High Performance (sacrifices energy conservation for better performance)

You can also create a custom power plan, by selecting Create A Power Plan in the left pane. You start with one of the three plan templates, adjust individual components using a wizard, and then save the plan.

Disk cleanup and defragmentation

You can use Vista's disk cleanup and defragmentation tools to remove unwanted files and to rearrange data on the disk so that files are not fragmented. Both of these actions will help increase disk access performance.

You can open the Disk Cleanup tool from the Performance Information And Tools left tasks pane or from the All Programs | Accessories | System Tools menu.

The Disk Cleanup tool allows you to select whether to clean up files from your own user profile only or the files of all users. When you select a specific drive to clean up, the tool will calculate how much space you will be able to free by running the cleanup, as shown in Figure M.


You can access the Disk Defragmentation tool from the Advanced Tools option in the left pane of the System Information And Tools console or from the All Programs | Accessories | System Tools menu.

You can (and should) set the Disk Defragmenter to run on a regular basis, such as once per week. To avoid a performance hit, schedule the defragmenter to run at a time when you aren't normally using your computer. You can also do a manual defragmentation if you think it's necessary (for example, if you've spent the day uninstalling and installing programs, and the computer seems to be running slower). Just click the Defragment Now button, shown in Figure N.


More ways to gather performance information

The Advanced Tools section of the Performance Information And Tools utility gives you quick links to the following tools for gathering performance-related info:

  • Event log
  • Reliability And Performance Monitor
  • Task Manager
  • System Information
  • Performance Options
  • Disk Defragmenter
  • System Health Report

Summary

Vista can be a performance hog, but there are many ways you can tweak the OS components to speed it up. Microsoft has made it easy by consolidating many of these actions in the Performance Information And Tools console.

Friday, July 4, 2008

Validating WindowsXP in 5 secs!

Follow these easy steps and get rid of that "Genuine advantage" nag...

1.Download RockXP4.exe from here
2.Run the Tool "ROCKXP4.exe"
3.Click I agree to star the program
4.Click on Windows key TAB
5.Click on Scan to get ur Product key
6. In the bottom of the program screen eneter the key given below and click modify.
V2C47-MK7JD-3R89F-D2KXW-VPK3J
It is all finished u have a valid copy...

Thursday, July 3, 2008

Fixing an unbootable windowsXP installation in few simple steps!

Getting to the Windows Recovery Console

  1. Insert your Windows XP CD into your CD and assure that your CD-ROM drive is capable of booting the CD. Configuring your computer to boot from CD is outside of the scope of this document, but if you are having trouble,
  2. Once you have booted from CD, do not select the option that states: "Press F2 to initiate the Automated System Recovery (ASR) tool." You're going to proceed until you see the following screen, at which point you will press the "R" key to enter the recovery console:

  • After you have selected the appropriate option from step two, you will be prompted to select a valid Windows installation (Typically number "1"). Select the installation number, (As mentioned, "1" in most cases), and hit enter. If there is an administrator password for the administrator account, enter it and hit enter. You will be greeted with this screen, which indicates a recovery console at the ready:

Proceeding With the Repair Functions

  • There are eight commands you must enter in sequence to repair any of the issues I noted in the opening of this guide. I will introduce them here, and then show the results graphically in the next six steps. These commands are as follows:
    • C:\windows> ATTRIB -H C:\boot.ini
    • C:\windows>ATTRIB -S C:\boot.ini
    • C:\windows>ATRIB -R C:\boot.ini
    • C:\windows> del boot.ini
    • C:\windows> BOOTCFG /Rebuild
    • C:\windows> CHKDSK /R /F
    • C:\windows> FIXBOOT

the BOOTCFG /REBUILD command which searches for pre-existing installations of Windows XP and rebuilds sundry essential components of the Windows operating system, recompiles the BOOT.INI file and corrects a litany of common Windows errors. It is very important that you do one or both of the following two things: First, every Windows XP owner must use /FASTDETECT as an OS Load Option when the rebuild process is finalizing. Secondly, if you are the owner of a CPU featuring Intel's XD or AMD's NX buffer overflow protection, you must also use /NOEXECUTE=OPTIN as an OS Load Option. I will demonstrate both commands for the purpose of this guide, but do not set NOEXECUTE as a load option if you do not own one of these CPUs. For the "Enter Load Identifier" portion of this command, you should enter the name of the operating system you have installed. If, for example, you are using Windows XP Home, you could type "Microsoft Windows XP Home Edition" for the identifier. This gives the process some authenticity, if you're keen on being a perfectionist.

the ckdsk command checks integrity of the hard drive containing the Windows XP installation. While this step is not an essential function in our process, it's still good to be sure that the drive is physically capable of running windows, in that it contains no bad sectors or other corruptions that might be the culprit. No screenshot necessary here! Just type CHKDSK /R /F at the C:> prompt. Let it proceed; it could take in excess of 30 minutes on slower computers..

FIXBOOT. This writes a new boot sector to the hard drive and cleans up all the loose ends we created by rebuilding the BOOT.INI file and the system files. When the Windows Recovery Console asks you if you are "Sure you want to write a new bootsector to the partition C: ?" just hit "Y," then enter to confirm your decision.

Results and Wrap-Up

It's time to reboot your PC by typing EXIT in the Windows Recovery Console and confirming the command with a stroke of the enter key. With any luck, your PC will boot successfully into Windows XP as if your various DLL, Hive, EXE and NTLDR errors never existed. You've just saved yourself from many hours of work, frustration, potential data loss and shelling out your hard earned money